This page provides the floor plan details of CN 7195. Specifically I’ll “walk” through the car and explain what each area looks like and what it was used for. I’ll have pictures showing how they look on CN 7195. For more history and a detailed view of each section, please see the appropriate page. What is here is only an overview.
The picture below is a “drawing” of the four combines in this series. You can kind of figure out the different sections of the car by looking at it, but I will walk you through all of them.
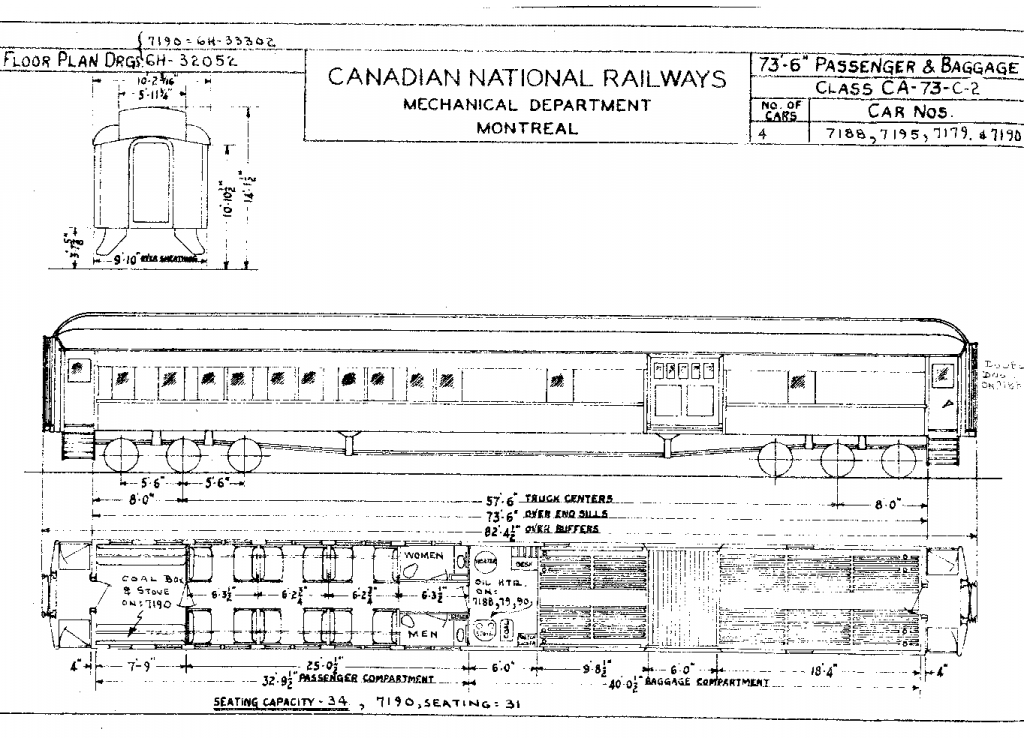
- Drawing of Combine cars as done by CNR.

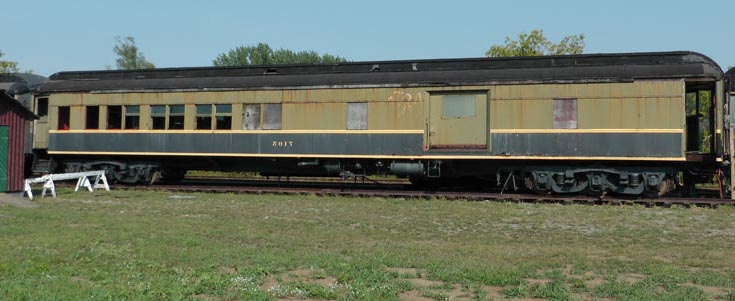
- Picture of car in the same orientation as the drawing above. The picture is flipped from what it actually on RMEO site.
So let’s start with some overall facts about the car in general.
- It was originally build in 1921 as a colonist sleeper (see the section “History of CNR 7195” for more detail).
- In 1956 it was re-purposed as a Combine.
- It weighs 72 tons (73 metric tonnes).
- Overall length is 84’4.5″ (25.7 meters)
- Internal length is 73’6″ (22.4 meters)
- Width 9’10” (3 meters)
- Interior surface area is 720 feet square (67 meters square)
The car is basically split into 2 compartments, the passenger compartment and the baggage compartment. Each of these areas is further subdivided as follows:
- Passenger Compartment
- Crew Compartment
- Seating Compartment
- Washrooms
- Baggage Compartment
- Work Area
- Freight Area
Starting on the left of the pictures, which is where the passengers would arrive, I’ll walk through the car explaining each section. The pictures used below are the best ones I have to date. As I get better pictures I will update them.
** A note about “left side” and “right side” as used below. The front of the car is the Crew Compartment, or the left side of the picture. When I talk about the “left side” or “right side”, it assumes the viewer is in the car and facing the “front” of the car (left side of the picture). In other words, in the photograph above you would in theory be looking at the left side of the car (I say in theory because the photograph is flipped for demonstration purposes and you are actually looking at the right side).
Passenger Compartment
Crew Compartment
The passengers would walk through the crew area in to the actually seating compartment. The crew area in 7195 consists of a bench on the left hand side, and a wood stove on the right hand side. While this is a “crew” area, it does look like it could be used for passengers if required. The bench can seat 5 people, which makes the seating capacity 29 for the car. In the diagram above it shows that 7190 had seating for 31 people as opposed to the normal 34 because of the coal stove, but this must be incorrect. The seating compartment sits 24, and each bench in the crew compartment can sit 5 people. To put 7 people on one bench would be a rather tight fit!
Unlike the diagram above, the bench is where the coal stove is marked, and the coal stove is on the right hand side. Looking at the picture, the first 2 windows are part of the Crew Compartment.
There is a partition wall that separates the Crew Compartment form the Seating Compartment. There is a left hand wall, which is a solid wall floor to ceiling, and a right hand wall which is solid up to the height of the seats, and then a metal grate to near the top of the wall. Presumably this was to allow any heat from the wood stove to make its way into the seating area, despite the car having steam heating in both compartments.
For more information on the Crew Compartment, see the web page “Interior – Crew Compartment“. More information on the stove can be found on the web page “Projects – Wood Stove”.
Seating Compartment
The seating compartment consisted of 12 “seats”, each one holding 2 people. They are arranged in sets facing each other. This means that there are 6 sets of 4 “seats”, 3 on each side of the car. Above the seats are luggage racks. For more information on the Seating Compartment, see the web page “Interior – Seating Compartment”.
Washrooms
At the end of the Passenger Compartment are the Washrooms, one for the men and one for the women. Just a note, the women’s washroom had been converted to hold an oil tank for the stove in the baggage car. I have removed the oil tank as it was not in the 1956 conversion, but I do not have any fixtures for the washroom. The men’s washroom is complete. For more information on the washrooms, see the web page “Interior – Washrooms”.
Baggage Compartment
Work Area
In the work area we find 4 main items. On the left side we find first an oil heater. On the mechanical drawing above it shows an oil heater on the other three cars in this series, but 7195 was converted later to an oil heater in the same place. Interesting enough, the coal bin is still there. Next to the oil heater in the electrical panel. It is still in amazingly good shape. On the other side of the car, the right hand side, we first have the Baker Heater. This is what was used to heat the car when not connected to the engine. Next to the Baker Heater is a crew work desk. For more information on the work area, see the web page “Interior – Work Area”.
Freight Area
The freight area is basically one big open area used to handle the baggage and freight. It had two big sliding doors for the cargo, and at the far end of the area, next to the exit door was a box to hold the batteries. As this car had to be self-sufficient, it need electrical power when not moving. It also had a wheel mounted generator to recharge the batteries while moving. For more information on the freight area, see the web page “Interior – Freight Area”.